microsoft MO-201 Exam Questions
Questions for the MO-201 were updated on : Jul 05 ,2025
Page 1 out of 2. Viewing questions 1-15 out of 25
Question 1 Topic 1, National Parks
SIMULATION
Instructions
nvironment
nterface and Controls
The exam panel provides access to the project task(s). Each project has an associated file in which you will perform the
project tasks.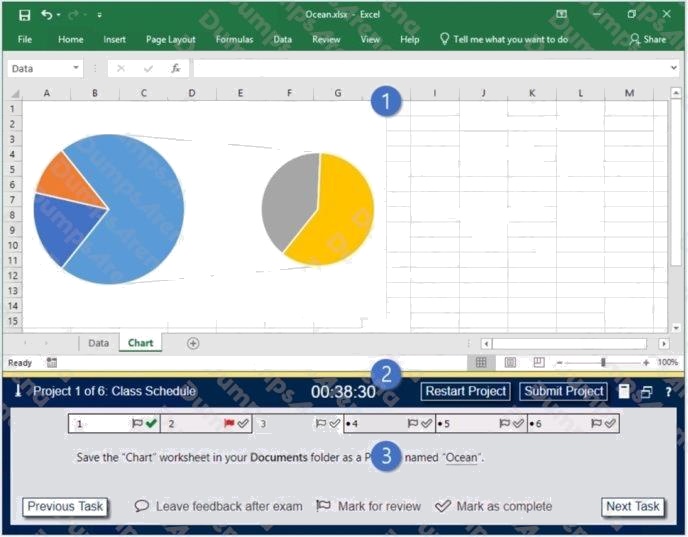
1. Project file
2. Split bar
3. Exam panel
You can modify the exam interface to fit your needs in the following ways:
To increase or decrease the exam panel font size, press Ctrl+Plus or Ctrl+Minus.
To change the height of the exam panel, drag the split bar between the project file and the exam panel.

To minimize the exam panel, click the Collapse Panel arrow
in the upper-left corner of the exam panel. The
minimized exam panel displays the Expand Panel button, the project number and name, the remaining time, and the Restart
Project and Submit Project buttons. To move between tasks, you must expand the exam panel. To restore the interface to
the default appearance, click the Restore button near the upper-right corner of the exam panel.
4. The Information bar at the top of the exam panel displays the current project and total number of projects, the remaining
exam time, and the following commands: Collapse Panel. Minimizes the exam panel to provide more space for the project
file.
Restart Project. Closes and reopens the current project file without saving your changes.
Submit Project. Saves your changes, submits the project file, and moves to the next project.
Calculator. A calculator is available in some exams. You are not required to use the calculator.
Restore. Restores the size and position of the project file and exam panel to the defaults. Help. Displays information

about the exam interface.
5. The Content area displays the task tabs and the current task description.
6. The Navigation area at the bottom of the exam panel contains the following commands.
Previous Task/Next Task. Saves your response and moves to the previous or next task in the current project.
Leave feedback after exam. Flags the task to indicate that you want to leave feedback about it after the exam.
Mark for review. Flags the task to indicate that you want to return to it before you finish the exam. Mark as complete.

Flags the task to indicate that you feel you have completed the task.
In projects that contain multiple tasks, you can switch between tasks by clicking the task tab, Next Task button, or Previous
Task button.
End of the instructions.
You are analyzing data about the number of visitors to U.S. National Parks.
Configure Excel so that you can edit content using Albanian as the editing language.
Do not make Albanian the default editing language. If you are prompted to restart Office, dismiss the prompt but do not
restart Excel.
1 (exhibit):
2 (exhibit):
3 (exhibit):
4 (exhibit):
5 (exhibit):
6 (exhibit):
7 (exhibit):
8 (exhibit):
9 (exhibit):
Answer:
See explanation below.
Explanation:
1. In the open document, click on File.
2. Click on Options.
3. Click on Language.
4. Under the Choose Editing Languages section, use the drop-down menu to select a new language for Office to use to
check spelling and grammar.
5. Click the Add button.
6. Click the OK button.
7. Click the OK button again.
Reference: https://www.windowscentral.com/how-change-proofing-language-settings-office
Question 2 Topic 1, National Parks
SIMULATION
Instructions
nvironment
nterface and Controls
The exam panel provides access to the project task(s). Each project has an associated file in which you will perform the
project tasks.
1. Project file
2. Split bar
3. Exam panel
You can modify the exam interface to fit your needs in the following ways:
To increase or decrease the exam panel font size, press Ctrl+Plus or Ctrl+Minus.
To change the height of the exam panel, drag the split bar between the project file and the exam panel.

To minimize the exam panel, click the Collapse Panel arrow
in the upper-left corner of the exam panel. The
minimized exam panel displays the Expand Panel button, the project number and name, the remaining time, and the Restart
Project and Submit Project buttons. To move between tasks, you must expand the exam panel. To restore the interface to
the default appearance, click the Restore button near the upper-right corner of the exam panel.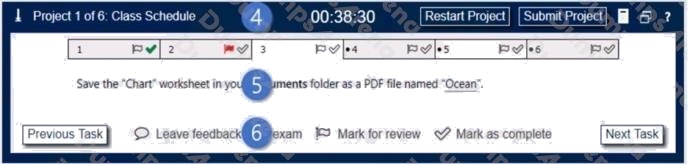
4. The Information bar at the top of the exam panel displays the current project and total number of projects, the remaining
exam time, and the following commands: Collapse Panel. Minimizes the exam panel to provide more space for the project
file.
Restart Project. Closes and reopens the current project file without saving your changes.
Submit Project. Saves your changes, submits the project file, and moves to the next project.
Calculator. A calculator is available in some exams. You are not required to use the calculator.
Restore. Restores the size and position of the project file and exam panel to the defaults. Help. Displays information

about the exam interface.
5. The Content area displays the task tabs and the current task description.
6. The Navigation area at the bottom of the exam panel contains the following commands.
- Previous Task/Next Task. Saves your response and moves to the previous or next task in the current project.
- Leave feedback after exam. Flags the task to indicate that you want to leave feedback about it after the exam.
- Mark for review. Flags the task to indicate that you want to return to it before you finish the exam. - Mark as complete.
Flags the task to indicate that you feel you have completed the task.
In projects that contain multiple tasks, you can switch between tasks by clicking the task tab, Next Task button, or Previous
Task button.
End of the instructions.
On the 2019 Visitors worksheet, modify the conditional formatting rule to format rows for parks that have a Size greater
than 1,000 square miles.
Exhibit 1 (exhibit):
Exhibit 2 (exhibit):
Exhibit 3 (exhibit):
Exhibit 4 (exhibit):
Exhibit 5 (exhibit):
Exhibit 6 (exhibit):
Exhibit 7 (exhibit):
Exhibit 8 (exhibit):
Exhibit 9 (exhibit):
Answer:
See explanation below.
Explanation:
1. Select the entire dataset.
2. Go to Home > Conditional Formatting > Highlighting Cell Rules > Greater Than.. / Less Than..
3. Select the Greater than option. In the dialogue box, enter the number in the field on the left. The intent is to highlight cells
that have a number greater than this specified number.
4. Specify the format to be applied to the cells that meet the condition by using the drop-down on the right, or specify your
own format using the Custom Format option.
5. Click OK.
Reference: https://trumpexcel.com/excel-conditional-formatting/
Question 3 Topic 1, National Parks
SIMULATION
Instructions
nvironment
nterface and Controls
The exam panel provides access to the project task(s). Each project has an associated file in which you will perform the
project tasks.
1. Project file
2. Split bar
3. Exam panel
You can modify the exam interface to fit your needs in the following ways:
To increase or decrease the exam panel font size, press Ctrl+Plus or Ctrl+Minus.
To change the height of the exam panel, drag the split bar between the project file and the exam panel.

To minimize the exam panel, click the Collapse Panel arrow
in the upper-left corner of the exam panel. The
minimized exam panel displays the Expand Panel button, the project number and name, the remaining time, and the Restart
Project and Submit Project buttons. To move between tasks, you must expand the exam panel. To restore the interface to
the default appearance, click the Restore button near the upper-right corner of the exam panel.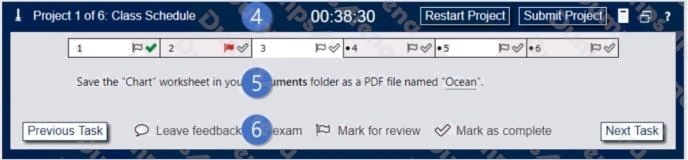
4. The Information bar at the top of the exam panel displays the current project and total number of projects, the remaining
exam time, and the following commands: Collapse Panel. Minimizes the exam panel to provide more space for the project
file.
Restart Project. Closes and reopens the current project file without saving your changes.
Submit Project. Saves your changes, submits the project file, and moves to the next project.
Calculator. A calculator is available in some exams. You are not required to use the calculator.
Restore. Restores the size and position of the project file and exam panel to the defaults. Help. Displays information

about the exam interface.
5. The Content area displays the task tabs and the current task description.
6. The Navigation area at the bottom of the exam panel contains the following commands.
Previous Task/Next Task. Saves your response and moves to the previous or next task in the current project.
Leave feedback after exam. Flags the task to indicate that you want to leave feedback about it after the exam.
Mark for review. Flags the task to indicate that you want to return to it before you finish the exam. Mark as complete.

Flags the task to indicate that you feel you have completed the task.
In projects that contain multiple tasks, you can switch between tasks by clicking the task tab, Next Task button, or Previous
Task button.
End of the instructions.
On the Summary worksheet, starting in cell A4, consolidate data from the 2014-2018 by Region worksheets. Display the
average number of the Recreation Visits for each Region. Use labels in both the top row and left column.
Delete the blank Park Name column from the consolidated data.
Exhibit 1 (exhibit):
Exhibit 2 (exhibit):
Exhibit 3 (exhibit):
Exhibit 4 (exhibit):
Exhibit 5 (exhibit):
Exhibit 6 (exhibit):
Exhibit 7 (exhibit):
Exhibit 8 (exhibit):
Exhibit 9 (exhibit):
Answer:
See explanation below.
Explanation:
1. Open the worksheets you want to consolidate.
2. Ensure the data in each spreadsheet is listed in a consistent format. Make sure the labels on each spreadsheet are listed
in a consistent format. For example, if you have the date listed in the top row, and the product listed in the left column, make
sure this is the same format for each spreadsheet. Make sure the rows and columns are in the same location for each
spreadsheet.
Delete any blank rows or columns in the spreadsheets.
3. Open a the Summary worksheet.
4. Click the cell that you want the consolidated rows and/or columns to start. Click the row and/or column that is consistent
with where the tables are located in the other spreadsheets.
5. Click Data. It's in the menu bar at the top of Excel. This displays the Data panel at the top of the page.
6. Click the Consolidate icon. It's the icon that resembles two sheets with a blue arrow in between them pointing to a blue
third sheet. This opens the consolidate menu.
7. Select a function. Use the drop-down menu below "Function" to select the method that the data will be consolidated. For
example, if you want to add all the data together, select Sum. You can also select Count, Average, Min, Max and other
functions.
8. Select a reference source. This is the first spreadsheet that you want to consolidate. If you want to consolidate sheets
within the same file, click the arrow icon to the right of the bar below "References".
9. Highlight the data you want to consolidate. If you are consolidating data from a separate sheet within the same file, click
and drag to highlight data and labels you want to consolidate. This will display sheet name followed by an exclamation mark
followed by the row and column range in the references column (For example: "Q1SalesSheet!$A$2:$F$5").
10. Click Add. It's to the right of the "All References" list box. This adds the reference and range you select to the list of
references. Repeat steps 6 through 10 for all sheets and files you want toconsolidate.
11. Select the row or column for the labels. Click one or both checkboxes next to "Top row" and/or "Left column" to select
which row or column contains the labels.
12. Click the checkbox next to "Create links to sources" (optional). By checking this option, the consolidated data will be
updated automatically if one of the source references is updated
13. Click Ok. This adds the consolidated data to the Summary worksheet. You can see the source data from the
consolidated data by clicking the plus icons (+) to the left of the cell numbers onthe left side.
1. With your spreadsheet open, press F5 on the keyboard. The Go To window will open. 2. Click on the Special button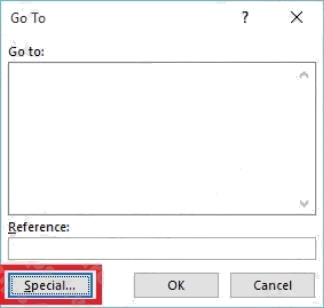
3. Click on Blanks then click OK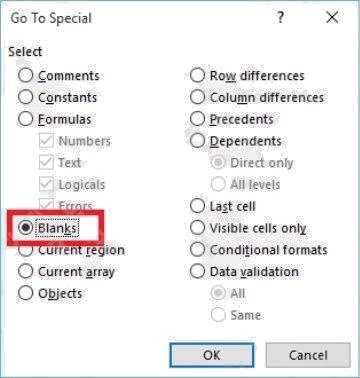
4. This will select all the empty fields within your table.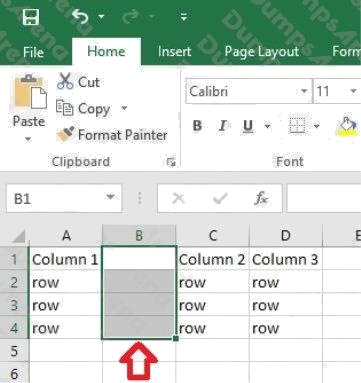
5. In the Home ribbon, click on the arrow below the Delete button then click on Delete Sheet Columns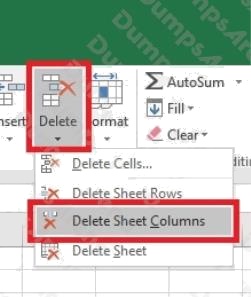
6. Your empty columns have now been removed.
Reference: https://www.wikihow.com/Consolidate-in-Excel#/Image:Consolidate-in-Excel-Step-5-Version-4.jpg
https://www.itsupportguides.com/knowledge-base/office-2016/excel-2016-how-to-delete-all-empty-columns/
Question 4 Topic 1, National Parks
Instructions
nvironment
nterface and Controls
The exam panel provides access to the project task(s). Each project has an associated file in which you will perform the
project tasks.
1. Project file
2. Split bar
3. Exam panel
You can modify the exam interface to fit your needs in the following ways:
To increase or decrease the exam panel font size, press Ctrl+Plus or Ctrl+Minus.
To change the height of the exam panel, drag the split bar between the project file and the exam panel.

To minimize the exam panel, click the Collapse Panel arrow
in the upper-left corner of the exam panel. The
minimized exam panel displays the Expand Panel button, the project number and name, the remaining time, and the Restart
Project and Submit Project buttons. To move between tasks, you must expand the exam panel. To restore the interface to
the default appearance, click the Restore button near the upper-right corner of the exam panel.
4. The Information bar at the top of the exam panel displays the current project and total number of projects, the remaining
exam time, and the following commands: Collapse Panel. Minimizes the exam panel to provide more space for the project
file.
Restart Project. Closes and reopens the current project file without saving your changes.
Submit Project. Saves your changes, submits the project file, and moves to the next project.
Calculator. A calculator is available in some exams. You are not required to use the calculator.
Restore. Restores the size and position of the project file and exam panel to the defaults. Help. Displays information

about the exam interface.
5. The Content area displays the task tabs and the current task description.
6. The Navigation area at the bottom of the exam panel contains the following commands.
Previous Task/Next Task. Saves your response and moves to the previous or next task in the current project.
Leave feedback after exam. Flags the task to indicate that you want to leave feedback about it after the exam.
Mark for review. Flags the task to indicate that you want to return to it before you finish the exam. Mark as complete.

Flags the task to indicate that you feel you have completed the task.
In projects that contain multiple tasks, you can switch between tasks by clicking the task tab, Next Task button, or Previous
Task button.
End of the instructions.
On the Volunteer Analysis chart sheet, drill down into the data to display the number of volunteer hours for each month.
Exhibit 1 (exhibit):
Exhibit 2 (exhibit):
Exhibit 3 (exhibit):
Exhibit 4 (exhibit):
Exhibit 5 (exhibit):
Exhibit 6 (exhibit):
Exhibit 7 (exhibit):
Exhibit 8 (exhibit):
Exhibit 9 (exhibit):
Answer: See explanation below.
Answer:
See explanation below.
Explanation:
If a chart has multiple fields in the Axis box, you set it to show levels and you see only one level at a time, starting with the
top level.
To enable drill-down, access the Design tab > Show Levels > Enable Drill Down One Level at a Time. if you double-click on
one of the bars, you will see the bars for the underlying data.
Reference: https://support.microsoft.com/en-us/office/add-drill-down-to-a-power-view-chart-or-matrix-d67c5026-62f7-4766-
9b22-3a8448c13ecd
ANSWER: See Explanation Below For Answer
Explanation:
If a chart has multiple fields in the Axis box, you set it to show levels and you see only one level at a time, starting with the
top level.
To enable drill-down, access the Design tab > Show Levels > Enable Drill Down One Level at a Time. if you double-click on
one of the bars, you will see the bars for the underlying data.
Reference: https://support.microsoft.com/en-us/office/add-drill-down-to-a-power-view-chart-or-matrix-d67c5026-62f7-4766-
9b22-3a8448c13ecd
Question 5 Topic 1, National Parks
SIMULATION
Instructions
nvironment
nterface and Controls
The exam panel provides access to the project task(s). Each project has an associated file in which you will perform the
project tasks.
1. Project file
2. Split bar
3. Exam panel
You can modify the exam interface to fit your needs in the following ways:
To increase or decrease the exam panel font size, press Ctrl+Plus or Ctrl+Minus.
To change the height of the exam panel, drag the split bar between the project file and the exam panel.

To minimize the exam panel, click the Collapse Panel arrow
in the upper-left corner of the exam panel. The
minimized exam panel displays the Expand Panel button, the project number and name, the remaining time, and the Restart
Project and Submit Project buttons. To move between tasks, you must expand the exam panel. To restore the interface to
the default appearance, click the Restore button near the upper-right corner of the exam panel.
4. The Information bar at the top of the exam panel displays the current project and total number of projects, the remaining
exam time, and the following commands: Collapse Panel. Minimizes the exam panel to provide more space for the project
file.
Restart Project. Closes and reopens the current project file without saving your changes.
Submit Project. Saves your changes, submits the project file, and moves to the next project.
Calculator. A calculator is available in some exams. You are not required to use the calculator.
Restore. Restores the size and position of the project file and exam panel to the defaults. Help. Displays information

about the exam interface.
5. The Content area displays the task tabs and the current task description.
6. The Navigation area at the bottom of the exam panel contains the following commands.
Previous Task/Next Task. Saves your response and moves to the previous or next task in the current project.
Leave feedback after exam. Flags the task to indicate that you want to leave feedback about it after the exam.
Mark for review. Flags the task to indicate that you want to return to it before you finish the exam. Mark as complete.

Flags the task to indicate that you feel you have completed the task.
In projects that contain multiple tasks, you can switch between tasks by clicking the task tab, Next Task button, or Previous
Task button.
End of the instructions.
You are analyzing data about the number of visitors to U.S. National Parks.
Configure Excel so that you can edit content using Albanian as the editing language.
Do not make Albanian the default editing language. If you are prompted to restart Office, dismiss the prompt but do not
restart Excel.
1 (exhibit):
2 (exhibit):
3 (exhibit):
4 (exhibit):
5 (exhibit):
6 (exhibit):
7 (exhibit):
8 (exhibit):
9 (exhibit):
Answer:
See explanation below.
Explanation:
1. In the open document, click on File.
2. Click on Options.
3. Click on Language.
4. Under the Choose Editing Languages section, use the drop-down menu to select a new language for Office to use to
check spelling and grammar.
5. Click the Add button.
6. Click the OK button.
7. Click the OK button again.
Reference: https://www.windowscentral.com/how-change-proofing-language-settings-office
Topic 2, Southridge Video
Question 6 Topic 2, Southridge Video
SIMULATION
Instructions
nvironment
nterface and Controls
The exam panel provides access to the project task(s). Each project has an associated file in which you will perform the
project tasks.
1. Project file
2. Split bar
3. Exam panel
You can modify the exam interface to fit your needs in the following ways:
To increase or decrease the exam panel font size, press Ctrl+Plus or Ctrl+Minus.
To change the height of the exam panel, drag the split bar between the project file and the exam panel.

To minimize the exam panel, click the Collapse Panel arrow
in the upper-left corner of the exam panel. The
minimized exam panel displays the Expand Panel button, the project number and name, the remaining time, and the Restart
Project and Submit Project buttons. To move between tasks, you must expand the exam panel. To restore the interface to
the default appearance, click the Restore button near the upper-right corner of the exam panel.
4. The Information bar at the top of the exam panel displays the current project and total number of projects, the remaining
exam time, and the following commands: Collapse Panel. Minimizes the exam panel to provide more space for the project
file.
Restart Project. Closes and reopens the current project file without saving your changes.
Submit Project. Saves your changes, submits the project file, and moves to the next project.
Calculator. A calculator is available in some exams. You are not required to use the calculator.
Restore. Restores the size and position of the project file and exam panel to the defaults. Help. Displays information

about the exam interface.
5. The Content area displays the task tabs and the current task description.
6. The Navigation area at the bottom of the exam panel contains the following commands.
Previous Task/Next Task. Saves your response and moves to the previous or next task in the current project.
Leave feedback after exam. Flags the task to indicate that you want to leave feedback about it after the exam.
Mark for review. Flags the task to indicate that you want to return to it before you finish the exam. Mark as complete.

Flags the task to indicate that you feel you have completed the task.
In projects that contain multiple tasks, you can switch between tasks by clicking the task tab, Next Task button, or Previous
Task button.
End of the instructions.
You are creating a workbook for the regional meeting of Southridge Video.
On the Regional Sales worksheet, in cells D4:F7, use the Fill Series feature to complete the sales projections using a linear
growth rate of 500,000 per year.
Exhibit 1 (exhibit):
Exhibit 2 (exhibit):
Exhibit 3 (exhibit):
Exhibit 4 (exhibit):
Exhibit 5 (exhibit):
Answer:
See explanation below.
Explanation:
1. Select all value cells for First-Year and Second-Year Sales.
2. Drag the fill handle to the Fifth-Year Projections column.
Reference: https://support.microsoft.com/en-us/office/project-values-in-a-series-5311f5cf-149e-4d06-81dd-5aaad87e5400
Question 7 Topic 2, Southridge Video
SIMULATION
Instructions
nvironment
nterface and Controls
The exam panel provides access to the project task(s). Each project has an associated file in which you will perform the
project tasks.
1. Project file
2. Split bar
3. Exam panel
You can modify the exam interface to fit your needs in the following ways:
To increase or decrease the exam panel font size, press Ctrl+Plus or Ctrl+Minus.
To change the height of the exam panel, drag the split bar between the project file and the exam panel.

To minimize the exam panel, click the Collapse Panel arrow
in the upper-left corner of the exam panel. The
minimized exam panel displays the Expand Panel button, the project number and name, the remaining time, and the Restart
Project and Submit Project buttons. To move between tasks, you must expand the exam panel.
To restore the interface to the default appearance, click the Restore button near the upper-right corner of the exam panel.

4. The Information bar at the top of the exam panel displays the current project and total number of projects, the remaining
exam time, and the following commands: Collapse Panel. Minimizes the exam panel to provide more space for the project
file.
Restart Project. Closes and reopens the current project file without saving your changes.
Submit Project. Saves your changes, submits the project file, and moves to the next project.
Calculator. A calculator is available in some exams. You are not required to use the calculator.
Restore. Restores the size and position of the project file and exam panel to the defaults. Help. Displays information

about the exam interface.
5. The Content area displays the task tabs and the current task description.
6. The Navigation area at the bottom of the exam panel contains the following commands.
Previous Task/Next Task. Saves your response and moves to the previous or next task in the current project.
Leave feedback after exam. Flags the task to indicate that you want to leave feedback about it after the exam.
Mark for review. Flags the task to indicate that you want to return to it before you finish the exam. Mark as complete.

Flags the task to indicate that you feel you have completed the task.
In projects that contain multiple tasks, you can switch between tasks by clicking the task tab, Next Task button, or Previous
Task button.
End of the instructions.
On the Employees worksheet, in cell C4, enter a formula that returns the office phone number from the
Contact_Information cell range using an exact match for the Region in column B.
Exhibit 1 (exhibit):
Exhibit 2 (exhibit):
Exhibit 3 (exhibit):
Exhibit 4 (exhibit):
Exhibit 5 (exhibit):
Answer:
See explanation below.
Explanation:
In cell C4, type =M4 and press Enter.
Question 8 Topic 2, Southridge Video
SIMULATION
Instructions
nvironment
nterface and Controls
The exam panel provides access to the project task(s). Each project has an associated file in which you will perform the
project tasks.
1. Project file
2. Split bar
3. Exam panel
You can modify the exam interface to fit your needs in the following ways:
To increase or decrease the exam panel font size, press Ctrl+Plus or Ctrl+Minus.
To change the height of the exam panel, drag the split bar between the project file and the exam panel.

To minimize the exam panel, click the Collapse Panel arrow
in the upper-left corner of the exam panel. The
minimized exam panel displays the Expand Panel button, the project number and name, the remaining time, and the Restart
Project and Submit Project buttons. To move between tasks, you must expand the exam panel. To restore the interface to
the default appearance, click the Restore button near the upper-right corner of the exam panel.
4. The Information bar at the top of the exam panel displays the current project and total number of projects, the remaining
exam time, and the following commands: Collapse Panel. Minimizes the exam panel to provide more space for the project
file.
Restart Project. Closes and reopens the current project file without saving your changes.
Submit Project. Saves your changes, submits the project file, and moves to the next project.
Calculator. A calculator is available in some exams. You are not required to use the calculator.
Restore. Restores the size and position of the project file and exam panel to the defaults. Help. Displays information

about the exam interface.
5. The Content area displays the task tabs and the current task description.
6. The Navigation area at the bottom of the exam panel contains the following commands.
Previous Task/Next Task. Saves your response and moves to the previous or next task in the current project.
Leave feedback after exam. Flags the task to indicate that you want to leave feedback about it after the exam.
Mark for review. Flags the task to indicate that you want to return to it before you finish the exam. Mark as complete.

Flags the task to indicate that you feel you have completed the task.
In projects that contain multiple tasks, you can switch between tasks by clicking the task tab, Next Task button, or Previous
Task button.
End of the instructions.
From the Employees worksheet, create a macro named Header. Store the macro in the current workbook. Configure the
macro to insert the Sheet Name in the left header cell of the active page and the Page Number in the right header cell.
Exhibit 1 (exhibit):
Exhibit 2 (exhibit):
Exhibit 3 (exhibit):
Exhibit 4 (exhibit):
Exhibit 5 (exhibit):
Answer:
See explanation below.
Explanation:
The Developer tab isn't displayed by default, but you can add it to the ribbon.
On the File tab, go to Options > Customize Ribbon.
Under Customize the Ribbon and under Main Tabs, select the Developer check box.
Record a macro
1. In the Code group on the Developer tab, click Record Macro.
2. Optionally, enter a name for the macro in the Macro name box and a description in the Description box, and then click OK
to start recording.
3. Select Page layout from the Ribbon and expand Page Setup.
4. Select the Header/Footer tab and click Custom Header.
5. In the Left section, click the Insert Sheet Name button.
6. In the Right section, click the Insert Page Number button.
7. Click OK. Then click OK again.
8. On the Developer tab, click Stop Recording.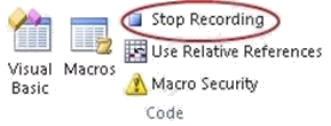
9. On the Developer tab, click Macros to view the available Macros.
10. Select the Macro and click Run.
Reference: https://support.microsoft.com/en-us/office/show-the-developer-tab-e1192344-5e56-4d45-931b-e5fd9bea2d45
https://support.microsoft.com/en-us/office/quick-start-create-a-macro-741130ca-080d-49f5-9471-1e5fb3d581a8
Question 9 Topic 2, Southridge Video
SIMULATION
Instructions
nvironment
nterface and Controls
The exam panel provides access to the project task(s). Each project has an associated file in which you will perform the
project tasks.
1. Project file
2. Split bar
3. Exam panel
You can modify the exam interface to fit your needs in the following ways:
To increase or decrease the exam panel font size, press Ctrl+Plus or Ctrl+Minus.
To change the height of the exam panel, drag the split bar between the project file and the exam panel.

To minimize the exam panel, click the Collapse Panel arrow
in the upper-left corner of the exam panel. The
minimized exam panel displays the Expand Panel button, the project number and name, the remaining time, and the Restart
Project and Submit Project buttons. To move between tasks, you must expand the exam panel. To restore the interface to
the default appearance, click the Restore button near the upper-right corner of the exam panel.
4. The Information bar at the top of the exam panel displays the current project and total number of projects, the remaining
exam time, and the following commands: Collapse Panel. Minimizes the exam panel to provide more space for the project
file.
Restart Project. Closes and reopens the current project file without saving your changes.
Submit Project. Saves your changes, submits the project file, and moves to the next project.
Calculator. A calculator is available in some exams. You are not required to use the calculator.
Restore. Restores the size and position of the project file and exam panel to the defaults. Help. Displays information

about the exam interface.
5. The Content area displays the task tabs and the current task description.
6. The Navigation area at the bottom of the exam panel contains the following commands.
Previous Task/Next Task. Saves your response and moves to the previous or next task in the current project.
Leave feedback after exam. Flags the task to indicate that you want to leave feedback about it after the exam.
Mark for review. Flags the task to indicate that you want to return to it before you finish the exam. Mark as complete.

Flags the task to indicate that you feel you have completed the task.
In projects that contain multiple tasks, you can switch between tasks by clicking the task tab, Next Task button, or Previous
Task button.
End of the instructions.
On the Plan Analysis worksheet, modify the PivotTable to group the data by the values in the Full Package Price column.
Group the values in steps of 100 beginning at 0 and ending at 200.
Exhibit 1 (exhibit):
Exhibit 2 (exhibit):
Exhibit 3 (exhibit):
Exhibit 4 (exhibit):
Exhibit 5 (exhibit):
Answer:
See explanation below.
Explanation:
In the PivotTable, right-click a value and select Group.
In the Grouping box, select Starting at and Ending at checkboxes, and edit the values if needed. (0 and 200 respectively)
Under By, enter a number that specifies the interval for each group. (100)
Select OK.
Reference:
https://support.microsoft.com/en-us/office/group-or-ungroup-data-in-a-pivottable-c9d1ddd0-6580-47d1-82bc-
c84a5a340725#:~:text=In%20the%20PivotTable%2C%20right%2Dclick,edit%20the% 20values%20if%20needed.
Question 10 Topic 2, Southridge Video
SIMULATION
Instructions
nvironment
nterface and Controls
The exam panel provides access to the project task(s). Each project has an associated file in which you will perform the
project tasks.
1. Project file
2. Split bar
3. Exam panel
You can modify the exam interface to fit your needs in the following ways:
To increase or decrease the exam panel font size, press Ctrl+Plus or Ctrl+Minus.
To change the height of the exam panel, drag the split bar between the project file and the exam panel.
To minimize the exam panel, click the Collapse Panel arrow
in the upper-left corner of the exam panel. The minimized
exam panel displays the Expand Panel button, the project number and name, the remaining time, and the Restart Project
and Submit Project buttons. To move between tasks, you must expand the exam panel. To restore the interface to the
default appearance, click the Restore button near the upper-right corner of the exam panel.
4. The Information bar at the top of the exam panel displays the current project and total number of projects, the remaining
exam time, and the following commands: Collapse Panel. Minimizes the exam panel to provide more space for the project
file.
Restart Project. Closes and reopens the current project file without saving your changes.
Submit Project. Saves your changes, submits the project file, and moves to the next project.
Calculator. A calculator is available in some exams. You are not required to use the calculator.
Restore. Restores the size and position of the project file and exam panel to the defaults. Help. Displays information about
the exam interface.
5. The Content area displays the task tabs and the current task description.
6. The Navigation area at the bottom of the exam panel contains the following commands.
Previous Task/Next Task. Saves your response and moves to the previous or next task in the current project.
Leave feedback after exam. Flags the task to indicate that you want to leave feedback about it after the exam.
Mark for review. Flags the task to indicate that you want to return to it before you finish the exam. Mark as complete. Flags
the task to indicate that you feel you have completed the task.
In projects that contain multiple tasks, you can switch between tasks by clicking the task tab, Next Task button, or Previous
Task button.
End of the instructions.
On the Popular Videos worksheet, for cells B4:C17, create a conditional formatting rule that displays the five lowest values
in bold Dark Red font.
Exhibit 1 (exhibit):
Exhibit 2 (exhibit):
Exhibit 3 (exhibit):
Exhibit 4 (exhibit):
Exhibit 5 (exhibit):
Answer:
See explanation below.
Explanation:
Select the entire dataset.
Go to Home > Conditional Formatting > Top/Bottom Rules > Top 10 Items (or %) / Bottom 10 Items (or %).
Select Bottom 10 items and a dialogue box will open. Change the number from 10 to 5 using the down arrow.
Specify the format to be applied to the cells that meet the condition by using the drop-down on the right and selecting the
Custom Format option.
In the dialog box that appears, select Bold from under Font style, then click the drop down arrow under Color and select Dark
Red from the Standard colors. Click OK.
Reference:
https://trumpexcel.com/excel-conditional-formatting/
Topic 3, Lucerne Publishing
Question 11 Topic 3, Lucerne Publishing
SIMULATION
Instructions
nvironment
nterface and Controls
The exam panel provides access to the project task(s). Each project has an associated file in which you will perform the
project tasks.
1. Project file
2. Split bar
3. Exam panel
You can modify the exam interface to fit your needs in the following ways:
To increase or decrease the exam panel font size, press Ctrl+Plus or Ctrl+Minus.
To change the height of the exam panel, drag the split bar between the project file and the exam panel.
To minimize the exam panel, click the Collapse Panel arrow
in the upper-left corner of the exam panel. The minimized
exam panel displays the Expand Panel button, the project number and name, the remaining time, and the Restart Project
and Submit Project buttons. To move between tasks, you must expand the exam panel. To restore the interface to the
default appearance, click the Restore button near the upper-right corner of the exam panel.
4. The Information bar at the top of the exam panel displays the current project and total number of projects, the remaining
exam time, and the following commands: Collapse Panel. Minimizes the exam panel to provide more space for the project
file.
Restart Project. Closes and reopens the current project file without saving your changes.
Submit Project. Saves your changes, submits the project file, and moves to the next project.
Calculator. A calculator is available in some exams. You are not required to use the calculator.
Restore. Restores the size and position of the project file and exam panel to the defaults. Help. Displays information about
the exam interface.
5. The Content area displays the task tabs and the current task description.
6. The Navigation area at the bottom of the exam panel contains the following commands.
Previous Task/Next Task. Saves your response and moves to the previous or next task in the current project.
Leave feedback after exam. Flags the task to indicate that you want to leave feedback about it after the exam.
Mark for review. Flags the task to indicate that you want to return to it before you finish the exam. Mark as complete. Flags
the task to indicate that you feel you have completed the task.
In projects that contain multiple tasks, you can switch between tasks by clicking the task tab, Next Task button, or Previous
Task button.
End of the instructions.
You work for Lucerne Publishing. You are compiling sales and royalty data for authors the company represents.
Configure Excel to disable all macros in the workbook without notification.
Exhibit 1 (exhibit):
Exhibit 2 (exhibit):
Exhibit 3 (exhibit):
Exhibit 4 (exhibit):
Exhibit 5 (exhibit):
Exhibit 6 (exhibit):
Answer:
See explanation below.
Explanation:
Click the File tab.
Click Options.
Click Trust Center, and then click Trust Center Settings.
In the Trust Center, click Macro Settings.
Select the Disable all macros without notification option. Click OK.
Reference: https://support.microsoft.com/en-us/office/enable-or-disable-macros-in-office-files-12b036fd-d140-4e74-b45e-
16fed1a7e5c6
Question 12 Topic 3, Lucerne Publishing
SIMULATION
Instructions
nvironment
nterface and Controls
The exam panel provides access to the project task(s). Each project has an associated file in which you will perform the
project tasks.
1. Project file
2. Split bar
3. Exam panel
You can modify the exam interface to fit your needs in the following ways:
To increase or decrease the exam panel font size, press Ctrl+Plus or Ctrl+Minus.
To change the height of the exam panel, drag the split bar between the project file and the exam panel.
To minimize the exam panel, click the Collapse Panel arrow
in the upper-left corner of the exam panel. The minimized
exam panel displays the Expand Panel button, the project number and name, the remaining time, and the Restart Project
and Submit Project buttons. To move between tasks, you must expand the exam panel. To restore the interface to the
default appearance, click the Restore button near the upper-right corner of the exam panel.
4. The Information bar at the top of the exam panel displays the current project and total number of projects, the remaining
exam time, and the following commands: Collapse Panel. Minimizes the exam panel to provide more space for the project
file.
Restart Project. Closes and reopens the current project file without saving your changes.
Submit Project. Saves your changes, submits the project file, and moves to the next project.
Calculator. A calculator is available in some exams. You are not required to use the calculator.
Restore. Restores the size and position of the project file and exam panel to the defaults. Help. Displays information about
the exam interface.
5. The Content area displays the task tabs and the current task description.
6. The Navigation area at the bottom of the exam panel contains the following commands.
Previous Task/Next Task. Saves your response and moves to the previous or next task in the current project.
Leave feedback after exam. Flags the task to indicate that you want to leave feedback about it after the exam.
Mark for review. Flags the task to indicate that you want to return to it before you finish the exam. Mark as complete. Flags
the task to indicate that you feel you have completed the task.
In projects that contain multiple tasks, you can switch between tasks by clicking the task tab, Next Task button, or Previous
Task button.
End of the instructions.
On the New Titles worksheet, for cells E4:E24, create and apply a custom number format that displays the dates in the
format 2020 January 01.
Exhibit 1 (exhibit):
Exhibit 2 (exhibit):
Exhibit 3 (exhibit):
Exhibit 4 (exhibit):
Exhibit 5 (exhibit):
Exhibit 6 (exhibit):
Answer:
See explanation below.
Explanation:
1. Select the cells you want to format.
2. Press CTRL+1.
3. In the Format Cells box, click the Number tab.
4. In the Category list, click Date, and then choose a date format you want in Type. You can adjust this format in the last step
below.
5. Go back to the Category list, and choose Custom. Under Type, youll see the format code for the date format you chose in
the previous step. The built-in date format cant be changed, so dont worry about messing it up. The changes you make will
only apply to the custom format youre creating.
6. In the Type box, make the changes you want using code from the table below. In our case, yyyy mmmm dd.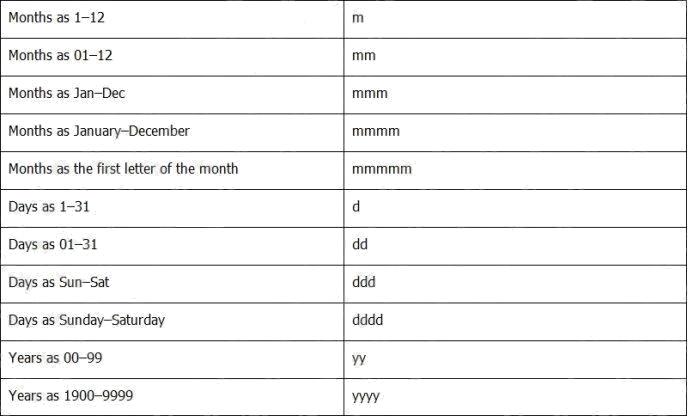
7. Click OK.
Reference:
https://support.microsoft.com/en-us/office/format-a-date-the-way-you-want-8e10019e-d5d8-47a1-ba95-db95123d273e
Question 13 Topic 3, Lucerne Publishing
SIMULATION
Instructions
nvironment
nterface and Controls
The exam panel provides access to the project task(s). Each project has an associated file in which you will perform the
project tasks.
1. Project file
2. Split bar
3. Exam panel
You can modify the exam interface to fit your needs in the following ways:
To increase or decrease the exam panel font size, press Ctrl+Plus or Ctrl+Minus.
To change the height of the exam panel, drag the split bar between the project file and the exam panel.
To minimize the exam panel, click the Collapse Panel arrow
in the upper-left corner of the exam panel. The minimized
exam panel displays the Expand Panel button, the project number and name, the remaining time, and the Restart Project
and Submit Project buttons. To move between tasks, you must expand the exam panel.
To restore the interface to the default appearance, click the Restore button near the upper-right corner of the exam panel.
4. The Information bar at the top of the exam panel displays the current project and total number of projects, the remaining
exam time, and the following commands: Collapse Panel. Minimizes the exam panel to provide more space for the project
file.
Restart Project. Closes and reopens the current project file without saving your changes.
Submit Project. Saves your changes, submits the project file, and moves to the next project.
Calculator. A calculator is available in some exams. You are not required to use the calculator.
Restore. Restores the size and position of the project file and exam panel to the defaults. Help. Displays information about
the exam interface.
5. The Content area displays the task tabs and the current task description.
6. The Navigation area at the bottom of the exam panel contains the following commands.
Previous Task/Next Task. Saves your response and moves to the previous or next task in the current project.
Leave feedback after exam. Flags the task to indicate that you want to leave feedback about it after the exam.
Mark for review. Flags the task to indicate that you want to return to it before you finish the exam. Mark as complete. Flags
the task to indicate that you feel you have completed the task.
In projects that contain multiple tasks, you can switch between tasks by clicking the task tab, Next Task button, or Previous
Task button.
End of the instructions.
On the Royalties worksheet, the existing formula in the Royalty Due column calculates the royalties due to each author.
On cell F4, modify the existing formula to return the amount of royalties due to the author only if the amount is greater than
$25, and otherwise returns 0.
Exhibit 1 (exhibit):
Exhibit 2 (exhibit):
Exhibit 3 (exhibit):
Exhibit 4 (exhibit):
Exhibit 5 (exhibit):
Exhibit 6 (exhibit):
Answer:
See explanation below.
Explanation:
You need to added reference an IF function to the current formula.
The modified formula should resemble the following: =IF(currentformula>25,currentformula,0)
Reference:
https://support.microsoft.com/en-us/office/use-nested-functions-in-a-formula-9d7c966d-6030-4cd6-a052-
478d7d844166?ui=en-us&rs=en-us&ad=us
Question 14 Topic 3, Lucerne Publishing
SIMULATION
Instructions
nvironment
nterface and Controls
The exam panel provides access to the project task(s). Each project has an associated file in which you will perform the
project tasks.
1. Project file
2. Split bar
3. Exam panel
You can modify the exam interface to fit your needs in the following ways:
To increase or decrease the exam panel font size, press Ctrl+Plus or Ctrl+Minus.
To change the height of the exam panel, drag the split bar between the project file and the exam panel.
To minimize the exam panel, click the Collapse Panel arrow
in the upper-left corner of the exam panel. The minimized
exam panel displays the Expand Panel button, the project number and name, the remaining time, and the Restart Project
and Submit Project buttons. To move between tasks, you must expand the exam panel. To restore the interface to the
default appearance, click the Restore button near the upper-right corner of the exam panel.
4. The Information bar at the top of the exam panel displays the current project and total number of projects, the remaining
exam time, and the following commands: Collapse Panel. Minimizes the exam panel to provide more space for the project
file.
Restart Project. Closes and reopens the current project file without saving your changes.
Submit Project. Saves your changes, submits the project file, and moves to the next project.
Calculator. A calculator is available in some exams. You are not required to use the calculator.
Restore. Restores the size and position of the project file and exam panel to the defaults. Help. Displays information about
the exam interface.
5. The Content area displays the task tabs and the current task description.
6. The Navigation area at the bottom of the exam panel contains the following commands.
Previous Task/Next Task. Saves your response and moves to the previous or next task in the current project.
Leave feedback after exam. Flags the task to indicate that you want to leave feedback about it after the exam.
Mark for review. Flags the task to indicate that you want to return to it before you finish the exam. Mark as complete. Flags
the task to indicate that you feel you have completed the task.
In projects that contain multiple tasks, you can switch between tasks by clicking the task tab, Next Task button, or Previous
Task button.
End of the instructions.
On the Sales Analysis worksheet, insert a slicer that allows users to filter the PivotTable by Category. Then use the slicer
to display only Psychology books.
The slicer size and position do not matter.
Exhibit 1 (exhibit):
Exhibit 2 (exhibit):
Exhibit 3 (exhibit):
Exhibit 4 (exhibit):
Exhibit 5 (exhibit):
Exhibit 6 (exhibit):
Answer:
See explanation below.
Explanation:
1. Click anywhere in the table or PivotTable.
2. On the Home tab, go to Insert > Slicer.
3. In the Insert Slicers dialog box, select the check boxes for the fields you want to display, then select OK.
4. A slicer will be created for every field that you selected. Clicking any of the slicer buttons will automatically apply that filter
to the linked table or PivotTable.
Reference:
https://support.microsoft.com/en-us/office/use-slicers-to-filter-data-249f966b-a9d5-4b0f-b31a-
12651785d29d#:~:text=On%20the%20Home%20tab%2C%20go,the%20linked%20table%20or% 20PivotTable.
Question 15 Topic 3, Lucerne Publishing
SIMULATION
Instructions
nvironment
nterface and Controls
The exam panel provides access to the project task(s). Each project has an associated file in which you will perform the
project tasks.
1. Project file
2. Split bar
3. Exam panel
You can modify the exam interface to fit your needs in the following ways:
To increase or decrease the exam panel font size, press Ctrl+Plus or Ctrl+Minus.
To change the height of the exam panel, drag the split bar between the project file and the exam panel.
To minimize the exam panel, click the Collapse Panel arrow
in the upper-left corner of the exam panel. The minimized
exam panel displays the Expand Panel button, the project number and name, the remaining time, and the Restart Project
and Submit Project buttons. To move between tasks, you must expand the exam panel. To restore the interface to the
default appearance, click the Restore button near the upper-right corner of the exam panel.
4. The Information bar at the top of the exam panel displays the current project and total number of projects, the remaining
exam time, and the following commands: Collapse Panel. Minimizes the exam panel to provide more space for the project
file.
Restart Project. Closes and reopens the current project file without saving your changes.
Submit Project. Saves your changes, submits the project file, and moves to the next project.
Calculator. A calculator is available in some exams. You are not required to use the calculator.
Restore. Restores the size and position of the project file and exam panel to the defaults. Help. Displays information about
the exam interface.
5. The Content area displays the task tabs and the current task description.
6. The Navigation area at the bottom of the exam panel contains the following commands.
Previous Task/Next Task. Saves your response and moves to the previous or next task in the current project.
Leave feedback after exam. Flags the task to indicate that you want to leave feedback about it after the exam.
Mark for review. Flags the task to indicate that you want to return to it before you finish the exam. Mark as complete. Flags
the task to indicate that you feel you have completed the task.
In projects that contain multiple tasks, you can switch between tasks by clicking the task tab, Next Task button, or Previous
Task button.
End of the instructions.
On the Royalty Analysis worksheet, add the Title ID field as a PivotChart filter. Apply the filter to the chart to display only
results for title ID CO20.
Exhibit 1 (exhibit):
Exhibit 2 (exhibit):
Exhibit 3 (exhibit):
Exhibit 4 (exhibit):
Exhibit 5 (exhibit):
Exhibit 6 (exhibit):
Answer:
See explanation below.
Explanation:
In the PivotTable Field list, click on the field that you want to use as a Report Filter. Drag the field into the Filters box.
On the worksheet, Excel adds the selected field to the top of the pivot table, with the item (All) showing. The values in the
pivot table do not change. Click the Report Filter's drop-down arrow, to see a list of items in the field. Click on an item to
select it, and click OK.
Reference: https://contextures.com/Excel-Pivot-Table-Report-Filters.html
Topic 4, Ski Lessons