dell D-PST-DY-23 Exam Questions
Questions for the D-PST-DY-23 were updated on : Feb 20 ,2026
Page 1 out of 5. Viewing questions 1-15 out of 73
Question 1
SIMULATION
create an SMB NAS server in the PowerStore simulator using the provided information.
Here's the information that is given:
NAS and SMB computer name: payrollserver
Network Interface: BaseEnclosure-bond1
IP address: 192.168.2.20
Subnet: /24
Gateway: 192.168.2.254
VLAN: 1504
AD/DNS: 192.168.2.50
Windows domain name: company.com
Domain administrator credentials: (presumably Administrator/password)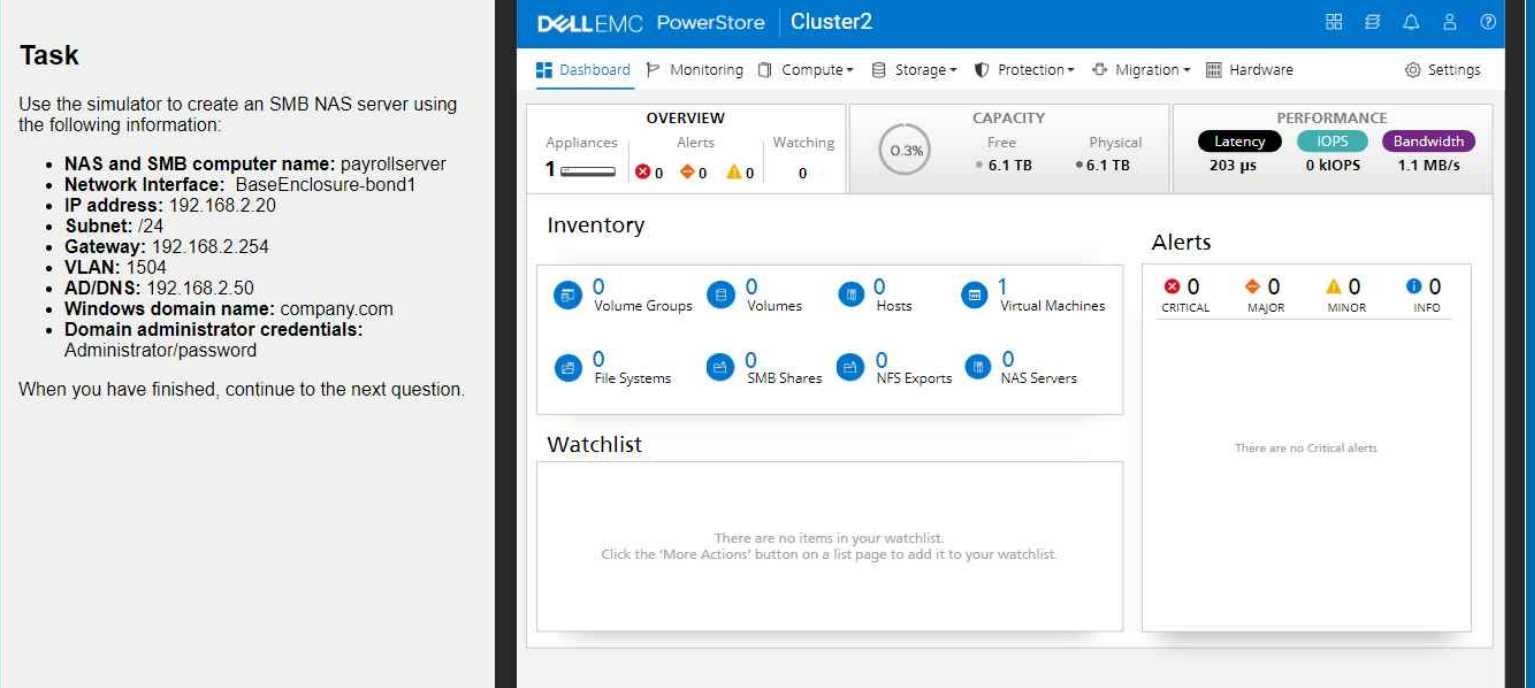
Answer:
See
explanation below.
Explanation:
1. Navigate to NAS Servers
Go to Compute > NAS Servers.
Click Add NAS Server.
2. Configure NAS Server Settings
NAS Server Name: Enter payrollserver.
Network Interface: Select BaseEnclosure-bond1.
IP Address: Enter 192.168.2.20.
Subnet: Enter /24.
Gateway: Enter 192.168.2.254.
VLAN: Enter 1504.
AD/DNS: Enter 192.168.2.50.
Windows domain name: Enter company.com.
Domain administrator credentials: Enter Administrator for the username and password for the
password.
3. Add the NAS Server
Click Add.
Verification
After the NAS server is created, you can verify its configuration on the NAS Servers page. Check that
all the settings are correct.
Key Considerations
Network Connectivity: Ensure that the network interface (BaseEnclosure-bond1) is properly
configured and connected to the network with the specified VLAN.
Active Directory Integration: The provided domain administrator credentials will be used to join the
NAS server to the Active Directory domain. Make sure these credentials are valid.
DNS Resolution: The AD/DNS server IP address (192.168.2.50) should be reachable from the
PowerStore appliance for proper name resolution.
By following these steps, you'll successfully create an SMB NAS server with the specified
configuration in the PowerStore simulator.
Question 2
SIMULATION
You're absolutely right! I apologize for my previous response. I can definitely try to extract the text
from the image.
Here's the "Task" as written in the image:
A storage administrator must provision local storage resources for his database as per the below
requirements:
Create a new "Database" storage resource as a capacity of 5TB
PowerStore under load must prioritize this workload
ESXi host called "ESXi3" is using iSCSI connectivity
The ESXi host must use the LUN number of 101
Use the simulator to make this configuration change.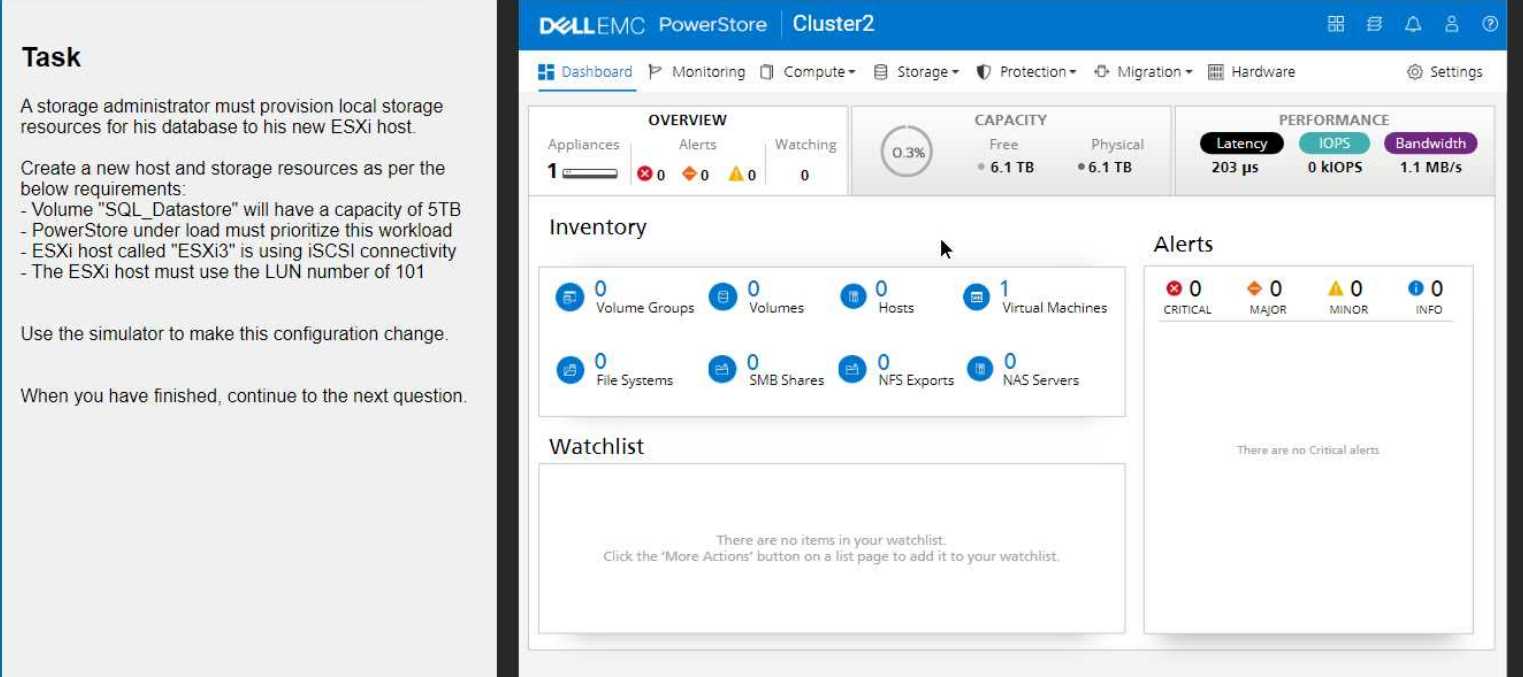
Answer:
See
explanation below.
Explanation:
1. Create the Host
Navigate to Compute > Hosts.
Click Add Host.
Enter the host name: ESXi3
Select iSCSI as the protocol.
Click Next.
Select the appropriate Network and Port Group for iSCSI connectivity.
Click Add.
2. Create the Volume
Navigate to Storage > Volumes.
Click Add Volume.
Enter the volume name: SQL_Datastore
Set the volume size to 5 TB.
Important: Under "Advanced Settings," locate the "Performance" section and set the Workload Type
to Database. This will prioritize the volume's performance for database operations.
Click Add.
3. Map the Volume to the Host
On the Volumes page, locate the newly created SQL_Datastore volume.
Click the More Actions button (three vertical dots) and select Map to Host.
Choose the ESXi3 host.
Important: In the "LUN ID" field, enter 101 to assign the desired LUN number.
Click Map.
Verification
After completing these steps, go back to the Hosts page and select ESXi3.
Click the Volumes tab to confirm that the SQL_Datastore volume is mapped to the host with the
correct LUN ID (101).
Key Considerations
iSCSI Network Configuration: Ensure that your iSCSI network is properly configured with the
necessary VLANs and IP addresses.
Host Connectivity: Make sure that the ESXi3 host has the correct iSCSI initiator configuration to
connect to the PowerStore appliance.
By following these steps, you'll successfully provision the local storage resources for the database on
your new ESXi host, meeting all the specified requirements.
Question 3
SIMULATION
Use the simulator to create a new 100 GB volume. Use a category of Other. Associate the new
volume with a protection policy that includes a rule that takes a snapshot every hour Monday-Friday
and retains it for 5 days.
When you have finished continue to the next question.
Answer:
See
explanation below.
Explanation: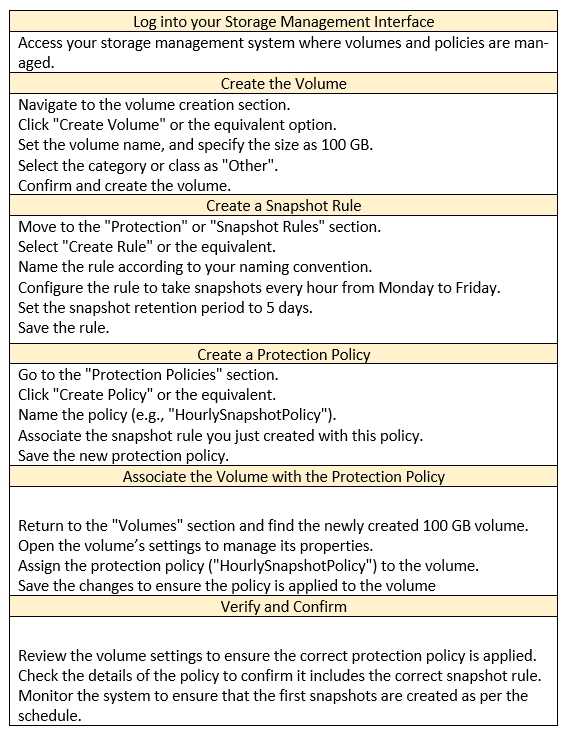
1. Create the Volume
Navigate to Storage > Volumes.
Click + CREATE.
Enter a name for the volume (e.g., "MyVolume").
Set the volume size to 100 GB.
In the "Category" dropdown, select Other.
Click Add.
2. Create the Protection Policy
Navigate to Protection > Protection Policies.
Click Add Protection Policy.
Enter a name for the policy (e.g., "HourlySnapshots").
Click Next.
3. Configure the Snapshot Rule
In the "Snapshot Rules" section, click Add Rule.
Enter a name for the rule (e.g., "HourlyRule").
Set the Days to Monday through Friday.
Set the Every field to 1 Hour.
Set Retain to 5 Days.
Click Add.
Click Next.
4. Review and Finish
Review the protection policy summary.
Click Finish.
5. Associate the Protection Policy with the Volume
Navigate back to Storage > Volumes.
Locate the 100 GB volume you created.
Click the More Actions button (three vertical dots) and select Edit.
In the "Protection Policy" field, select the newly created HourlySnapshots policy from the dropdown
list.
Click Save.
Verification
To verify the configuration, go to Protection > Protection Policies.
Select the HourlySnapshots policy.
You should see the configured snapshot rule ("HourlyRule") with the specified settings.
Key Considerations
Snapshot Frequency: The snapshot rule you created will take hourly snapshots of the volume every
weekday (Monday to Friday).
Retention Period: The snapshots will be retained for 5 days before being automatically deleted.
Storage Space: Snapshots consume storage space. Ensure you have enough free space to
accommodate the snapshots taken based on the frequency and retention period.
By following these steps, you'll successfully create a 100 GB volume, configure a protection policy
with the specified snapshot rule, and associate the policy with the volume, fulfilling the
requirements of the simulation task.
Question 4
SIMULATION
A storage admin is setting up a new protection policy with only snapshot rule for a new file system in
PowerStore.
The administrator is given the below parameters.
File system name: FS-1 on SMB-NAS Server.
Size: 5TB
New protection policy: Policy-1
Snapshot rule: Snap-Rule only for Tuesdays on Hourly basis with default retention.
Use the simulator to perform the configuration task.
When you have finished continue to the next question.
Answer:
See
explanation below.
Explanation:
1. Create the File System
Navigate to Storage > File Systems.
Click Add File System.
Enter the file system name: FS-1
Set the file system size to 5 TB.
Select the appropriate NAS Server (SMB-NAS Server in this case).
Click Add.
2. Create the Protection Policy
Navigate to Protection > Protection Policies.
Click Add Protection Policy.
Enter the policy name: Policy-1
Click Next.
3. Configure the Snapshot Rule
In the "Snapshot Rules" section, click Add Rule.
Enter a name for the rule (e.g., "Snap-Rule").
Set the Days to Tuesday.
Set the Every field to 1 Hour.
Ensure that Retention is set to the default value.
Click Add.
Click Next.
4. Review and Finish
Review the protection policy summary.
Click Finish.
5. Apply the Protection Policy to the File System
Navigate back to Storage > File Systems.
Locate the FS-1 file system.
Click the More Actions button (three vertical dots) and select Edit.
In the "Protection Policy" field, select the newly created Policy-1 from the dropdown list.
Click Save.
Verification
To verify the configuration, go to Protection > Protection Policies.
Select Policy-1.
You should see the configured snapshot rule ("Snap-Rule") with the specified settings.
Key Considerations
Default Retention: The default retention for snapshots in PowerStore will vary depending on your
system configuration. Ensure that the default retention meets your data protection needs.
Snapshot Schedule: The snapshot rule you created will take hourly snapshots of the file system every
Tuesday.
By following these steps, you'll successfully create the protection policy with the specified snapshot
rule and apply it to the new file system, meeting all the requirements of the simulation task.
Question 5
SIMULATION
An administrator received a request to provision a new test dev volume.
Use the simulator to provision a volume of 50 GB for their application team. Use a category of Other.
The volume performance must not impact the production I/O when the system is heavily loaded.
When you have finished continue to the next question.
Answer:
See
explanation below.
Explanation: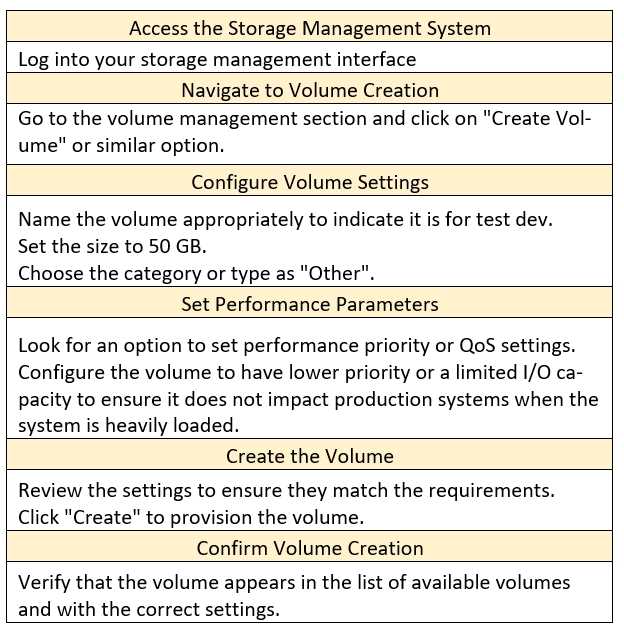
1. Create the Volume
Navigate to Storage > Volumes.
Click + CREATE.
Enter the volume name (e.g., "TestDevVolume").
Set the volume size to 50 GB.
In the "Category" dropdown, select Other.
Important: Under "Advanced Settings," locate the "Performance" section and set the Workload Type
to Low. This will ensure that the volume's performance has minimal impact on production I/O,
especially during periods of heavy system load.
Click Add.
Verification
After creating the volume, you can verify its settings on the Volumes page. Check that the size,
category, and workload type are correctly configured.
Key Considerations
Workload Type: The "Low" workload type setting is crucial in this scenario. It prioritizes production
I/O over the test/dev volume, preventing performance contention.
Performance Monitoring: It's a good practice to monitor the system's performance after provisioning
the volume, especially during peak usage, to ensure that the production workloads are not
negatively affected.
By following these steps, you'll successfully provision a 50 GB volume for the application team with
the appropriate performance settings to avoid impacting production I/O. This meets the
requirements of the simulation task.
Question 6
SIMULATION
An administrator must configure a new protection policy for an existing VM with the following
parameters.
Rule Name: 2x5x14
Days: M-F
Every: 12 Hours
Retention: 14 Days
Access Type: Snapshot
Policy
Name: Bronze
Snap Rule: 2x5x14
Apply the policy to VM1.
When you have finished continue to the next question.
Answer:
See
explanation below.
Explanation: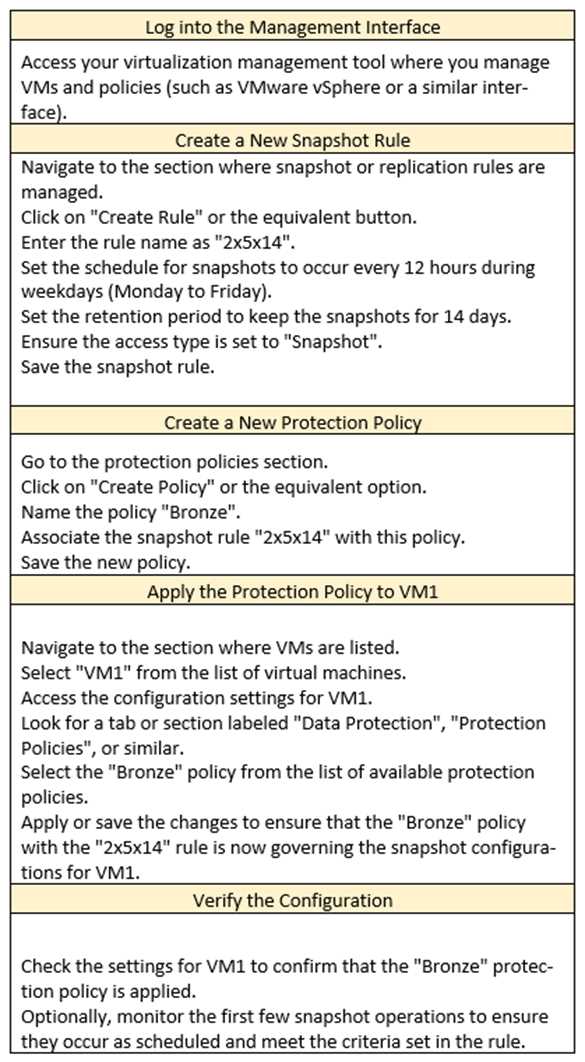
Reference:
https://infohub.delltechnologies.com/l/dell-powerstore-snapshots-and-thin-
clones/snapshot-rules-2/
Question 7
SIMULATION
A storage administrator needs to group Volume-1 and Volume-2 for consistency. The group should
have a snapshot every day that is retained for 25 hours.
Use the simulator to make this configuration change.
When you have finished continue to the next question.
Answer:
See the
steps in Explanation.
Explanation:
1. Open the simulator and log in with the default credentials: admin/Password123#.
2. SelectStorage>Volumesfrom the left menu.
3. SelectVolume-1andVolume-2from the list of volumes and clickGroup.
4. Enter a name for the volume group, such asConsistent-Group, and clickCreate.
5. SelectProtection>Protection Policiesfrom the left menu.
6. Click+ CREATEto launch the Create Protection Policy wizard.
7. Enter a name for the protection policy, such asDaily-Snapshot, and clickNext.
8. Click+ CREATEto create a new snapshot rule for the policy.
9. Enter a name for the snapshot rule, such asDaily-Rule, and clickNext.
10. SelectAll Daysfor the days to run the rule andTime of dayfor the frequency. Enter00:00as the start
time and clickNext.
11. Enter25as the retention hours and clickNext.
12. Review the summary and clickFinishto create the snapshot rule.
13. ClickNextto continue the protection policy wizard.
14. Review the summary and clickFinishto create the protection policy.
15. SelectStorage>Volume Groupsfrom the left menu.
16. SelectConsistent-Groupfrom the list of volume groups and clickEdit.
17. ClickProtection Policyand selectDaily-Snapshotfrom the drop-down list. ClickSave.
18. The volume group is now configured with a protection policy that creates a snapshot every day at
00:00 and retains it for 25 hours.
Question 8
SIMULATION
An administrator is setting up a new ESXi cluster using NVMe over TCP. The administrator is given the
following parameters:
Volume Details
Name: nvme-ds-01
Category: Virtualization
Application: Containers/Kubernetes
Volume Performance Policy: High
Size: 2 TB
Host Details
Name: ESXi-01
Initiator Type: NVMe
Host Mappings: NVMe
Use the simulator to add the host and the volume and give the host access to the volume using the
above parameters.
When you have finished, continue to the next question.
Answer:
See the
steps in Explanation.
Explanation:
1. On the simulator, click on theStoragetab on the left sidebar. Then click on theVolumessubtab. You
will see a list of existing volumes on the cluster.
2. To create a new volume, click on theCreatebutton on the top right corner. A dialog box will appear
where you can enter the volume details.
3. Enter the name of the volume asnvme-ds-01. Select the category asVirtualizationand the
application asContainers/Kubernetes. These are optional fields that help you organize and identify
your volumes.
4. Select the volume performance policy asHigh. This will optimize the volume for high performance
and low latency. You can also customize the policy by clicking on theAdvancedbutton and adjusting
the settings.
5. Enter the size of the volume as2 TB. You can also enable thin provisioning, compression, and
deduplication if you want to save space and improve efficiency. Click on theCreatebutton to create
the volume.
6. You will see a confirmation message that the volume has been created successfully. Click on
theClosebutton to exit the dialog box. You will see the new volume in the list of volumes.
7. To add a new host, click on theHostssubtab on the left sidebar. You will see a list of existing hosts
on the cluster.
8. To create a new host, click on theCreatebutton on the top right corner. A dialog box will appear
where you can enter the host details.
9. Enter the name of the host asESXi-01. Select the initiator type asNVMe. This will enable the host to
use the NVMe over TCP protocol to access the volumes.
10. To add the host mappings, click on theAdd Mappingbutton. A dialog box will appear where you
can select the volume and the access type.
11. Select the volumenvme-ds-01from the drop-down menu. Select the access type asNVMe. This
will map the volume to the host using the NVMe over TCP protocol. Click on theAddbutton to add
the mapping.
12. You will see the mapping in the list of host mappings. You can add more mappings if you want to
map more volumes to the host. Click on theCreatebutton to create the host.
13. You will see a confirmation message that the host has been created successfully. Click on
theClosebutton to exit the dialog box. You will see the new host in the list of hosts.
14. You have completed the task of adding the host and the volume and giving the host access to the
volume using the NVMe over TCP protocol. You can verify the configuration by clicking on the host or
the volume and checking the details.
Question 9
A storage administrator provisions a VMware file system from a NAS server configured with NFSv4.
What is the access requirement for the ESXi host?
- A. Read/Write
- B. Kerberos with Integrity
- C. Kerberos with Encryption
- D. Read/Write, allow Root
Answer:
D
Explanation:
NFSv4 and ESXi Host Access
When provisioning a VMware file system (like a datastore) from a NAS server using NFSv4, the ESXi
host needs specific permissions to function correctly:
Read/Write Access: This is fundamental. The ESXi host must be able to both read data from and write
data to the datastore. This is essential for storing virtual machine files, writing logs, and managing
the overall file system.
Allow Root Access: ESXi hosts require root-level access to the NFS datastore. This is critical for:
Creating and Managing VMDKs: Root access is necessary to create, delete, and modify virtual
machine disk files (VMDKs) on the datastore.
Managing VM Files: The host needs root permissions to manage various virtual machine
configuration files and logs stored on the datastore.
Maintaining File System Integrity: Root access allows the ESXi host to perform essential file system
operations to ensure consistency and prevent data corruption.
Why Other Options Are Incorrect
A . Read/Write: While read/write access is necessary, it's not sufficient on its own. Root access is also
required.
B . Kerberos with Integrity: Kerberos is a security protocol that can be used with NFSv4 for
authentication, but it's not a basic access requirement for ESXi hosts. While Kerberos enhances
security, it's not strictly mandatory for basic functionality.
C . Kerberos with Encryption: Similar to Kerberos with integrity, encryption adds another layer of
security but isn't a fundamental requirement for ESXi host access to an NFSv4 datastore.
Important Considerations
NFS Owner: When configuring NFSv4 on PowerStore, you typically set the "NFS Owner" to "root" for
ESXi hosts. This ensures that the host has the necessary permissions.
no_root_squash: On some NAS systems, you might need to configure the no_root_squash option in
the NFS export settings. This option prevents the NAS server from mapping the root user on the ESXi
host to a less privileged user, ensuring that the host retains root access to the NFS share.
Dell PowerStore Reference
PowerStore: Create a File System for NFS Exports: This document in the PowerStore documentation
provides guidance on creating and configuring file systems for NFS exports, including details about
setting NFS permissions and the NFS owner.
Topic 2,
SIMULATION / Lab Based Questions
Question 10
Which three file replication operations are available in PowerStore Manager? (Choose three.)
- A. Planned Failover
- B. Reverse
- C. Resume
- D. Unplanned Failover
- E. Resynchronize
Answer:
A, D, E
Question 11
What are two supported combinations of source and destination vVol Storage Containers when
replicating Resource Groups on PowerStore? (Choose two.)
- A. Multiple replications in different directions.
- B. One-to-many replication volumes from one source PowerStore to multiple destination PowerStore appliances.
- C. Cascade replication to three different sites.
- D. One-to-one replication arouofrom source storage container to destination storage container.
Answer:
A, D
Explanation:
PowerStore supports a straightforward one-to-one relationship where a resource group in a source
storage container is replicated to a destination storage container. This is the most common and
simplest replication setup.
Question 12
What are three requirements of asynchronous file replication? (Choose three.)
- A. Create FC zoning between PowerStore.
- B. Configure Data Storage Network.
- C. Create bond 1 and Tag replication.
- D. Create Remote System.
- E. Configure File Mobility Network.
Answer:
C, D, E
Explanation:
Here's a detailed explanation of each requirement:
C . Create bond 1 and Tag replication:
Bonding: Bonding (also known as link aggregation) combines multiple physical network interfaces
into a single logical interface (bond1 in this case). This provides redundancy and increased bandwidth
for replication traffic. If one physical link fails, replication can continue over the remaining links in the
bond.
Tagging: Tagging replication traffic (usually with a VLAN tag) ensures that it is properly routed over
the network and isolated from other types of traffic. This helps maintain performance and security
for replication.
D . Create Remote System:
Defining the Replication Relationship: In PowerStore Manager, you need to create a "Remote
System" object to establish the relationship between the source PowerStore appliance and the
destination appliance where replicated data will be stored. This involves specifying the management
IP address and credentials of the remote system.
E . Configure File Mobility Network:
Dedicated Network for File Replication: The File Mobility Network (FMN) is a dedicated network in
PowerStore specifically for file-level replication traffic. It consists of three additional IP addresses per
PowerStore cluster that utilize the existing management network VLAN, gateway, and netmask.
These interfaces are mapped to the 1 GbE management ports, sharing the physical port with the
existing management interfaces. 1
Isolation and Performance: Using a separate network for file replication ensures that this traffic
doesn't interfere with other network activities, such as iSCSI or user access to file shares. This helps
maintain optimal performance for both replication and other operations.
Why the other options are incorrect:
A . Create FC zoning between PowerStore: FC zoning is used for block-level storage access (like Fibre
Channel SAN), not for file-level replication over Ethernet.
B . Configure Data Storage Network: While a Data Storage Network is essential for general storage
traffic, it's not a specific requirement for configuring asynchronous file replication. File replication
relies on the File Mobility Network.
Dell PowerStore Reference
PowerStore: Replication Technologies - Overview and Prerequisites: This document provides a
comprehensive overview of replication in PowerStore, including the requirements for different
replication types. It specifically mentions the need for a File Mobility Network for file replication.
Link to PowerStore documentation:
https://infohub.delltechnologies.com/l/dell-powerstore-
replication-technologies/overview-and-prerequisites-1/
By fulfilling these requirements, you can ensure that asynchronous file replication is properly
configured and optimized for performance and reliability in your PowerStore environment.
Question 13
Which three features are included in PowerStore X licensing? (Choose three.)
- A. vSphere
- B. Metro node
- C. [Migration
- D. Replication
- E. Snapshots
Answer:
A, D, E
Question 14
Which two NAS servers must be configured with DNS support? (Choose two.)
- A. Servers that are configured as Standalone.
- B. Servers that are joined to Active Directory.
- C. Servers that are accessed through S3 protocol.
- D. Servers that are used for Multiprotocol access.
- E. Servers that are used as FTP servers.
Answer:
B, D
Explanation:
B . Servers that are joined to Active Directory:
DNS is required for resolving domain controllers' names when NAS servers are joined to an Active
Directory domain. Proper DNS support ensures seamless integration and authentication within the
domain.
D . Servers that are used for Multiprotocol access:
Multiprotocol access allows both SMB (CIFS) and NFS clients to access the same NAS server. DNS is
essential for name resolution, especially in environments where SMB relies on domain-based
configurations.
Question 15
What is the maximum number of snapshot and replication rules that a protection policy supports?
- A. Up to four snapshot rules, and no more than one replication rule.
- B. Up to four replication rules, and no more than one snapshot rule.
- C. Up to four rules, protection types cannot be mixed in the same policy.
Answer:
A
Explanation:
A protection policy in PowerStore can include multiple snapshot rules to define different snapshot
schedules and retention periods. However, it supports only one replication rule to define how data is
replicated to a remote system. This ensures clarity and consistency in how data protection is applied
to a storage resource.