dell D-PDD-DY-23 Exam Questions
Questions for the D-PDD-DY-23 were updated on : Feb 20 ,2026
Page 1 out of 7. Viewing questions 1-15 out of 91
Question 1
SIMULATION
PowerProtect DD Test Simulator
You will need to use the PowerProtect DD Simulator to correctly answer question. The simulator
allows you to navigate through the PowerProtect DD interface and configure many items. You will be
scored on your ability to perform tasks, configure items, and gather information within the simulated
environment.
Task
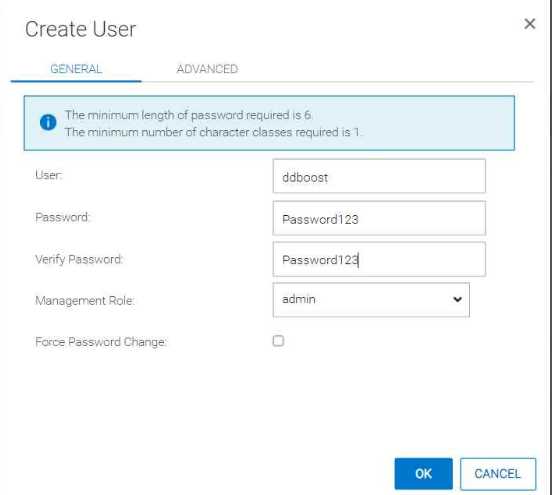
Use the simulator to configure DD Boost by enabling it and creating a new user (ddboost) with the
recommended permission. Use Password123 as the password. A storage unit name SU1 must be
created and accessible by the user.
When you have finished, continue to the next question.
Answer:
See the
solution in the
explanation below.
Explanation:
To configure DD Boost on the PowerProtect DD system and create the required user and storage unit,
follow these steps:
Enable DD Boost:
Go to the DD System Manager.
Navigate to DD Boost Settings.
Click on Enable to activate DD Boost on the system.
2. Create the User 'ddboost':
Go to Access Management > Local Users.
Click Create to add a new user.
Set the username to ddboost and the password to Password123.
Assign the user management role (the recommended permission for DD Boost users).
Click OK to create the user.
3. Create the Storage Unit 'SU1':
Go to Storage Units in the DD Boost section.
Click Create to add a new storage unit.
Name the storage unit SU1.
Assign the ddboost user to this storage unit for access.
Set any quota limits if required, or leave them as None if no restrictions are needed.
Click Create to finalize the storage unit creation.
After completing these steps, DD Boost will be enabled, and the ddboost user with appropriate
permissions will have access to the newly created storage unit SU1.
Question 2
SIMULATION
PowerProtect DD Test Simulator
You will need to use the PowerProtect DD Simulator to correctly answer question. The simulator
allows you to navigate through the PowerProtect DD interface and configure many items. You will be
scored on your ability to perform tasks, configure items, and gather information within the simulated
environment.
Task
As an administrator, you observe that the PowerProtect DD does not free disk space even though the
backup retention period expired a month ago.
Check the cleaning schedule. Set the default parameters: Start every Tuesday at 6:00 am. Set the
throttle for scheduled cleaning to 50%. After setting the schedule, start cleaning manually and make
sure the system resources are not used more than 30% for this cleaning.
When you have finished, continue to the next question.

Answer:
See the
solution in the
explanation below.
Explanation:
To resolve the issue and set up the cleaning schedule and manual cleaning on your PowerProtect DD
system, follow these steps based on the information provided:
Access the Cleaning Schedule Settings:
Go to File System Settings.
Navigate to the Cleaning tab.
2. Set the Cleaning Schedule:
Frequency: Choose Weekly.
At: Set the cleaning to start every Tuesday at 6:00 AM.
Throttle: Set the throttle to 50% for scheduled cleaning.
3. Manually Start Cleaning:
After setting the schedule, initiate the cleaning manually from the File System settings.
Set the manual cleaning throttle to 30% to ensure system resources are not overused during the
process.
Question 3
A backup administrator is using a dynamic interface group for client backups. The backups continue
to fail.
Why are the backups failing?
Note: It is necessary to close (x) the simulator window before you can select a response to this
question.
- A. Interface is not configured
- B. No cable link status
- C. DDBoost Status is disabled
- D. Interface is disabled
Answer:
C
Explanation:
If backups are failing when using a dynamic interface group, one of the likely causes is that DD Boost
is disabled. Since DD Boost is essential for optimized data transfer during backups, its disabled status
would lead to backup failures even if other configurations appear correct.
If you need to verify this in the simulator:
Go to the Protocols section.
Check the status of DD Boost.
Ensure that DD Boost is enabled to allow backups to proceed successfully.
Question 4
A customer is going to manage access to PowerProtect DD and wants to know which authentication
methods are available in DD System Manager.
Use the simulator to explore the system. Which authentication method is supported?
Note: It is necessary to close (x) the simulator window before you can select a response to this
question.
- A. RADIUS
- B. OAuth
- C. NIS
- D. PAP
Answer:
A
Explanation:
RADIUS is commonly supported in PowerProtect DD for external authentication, allowing integration
with centralized authentication systems for user management and access control.
Question 5
SIMULATION
Task 7
An engineer is implementing a new PowerProtect DD system. Retention Lock
Compliance Edition is required.
Use the simulator to ensure that the account asterix1 with the password password2 is in place and
the correct role assigned. Set the password to be required to change after 180 days.
When you have finished, continue to the next question.
Answer:
See the
solution in the
explanation below.
Explanation:
To configure a user account for Retention Lock Compliance Edition with specific role and password
policies on a PowerProtect DD system, follow these steps:
Step 1: Access the User Management Section
In the DD System Manager interface, go to Administration or Users (exact location may vary).
Look for an option to manage user accounts.
Step 2: Create or Verify the Account
If the account asterix1 already exists:
Select the user and edit the properties.
If the account does not exist:
Click on Add User or Create New User.
Enter the Username as asterix1.
Set the Password as password2.
Step 3: Assign the Compliance Role
Ensure that asterix1 is assigned the correct role, which is usually Security Officer or a similar role
necessary for Retention Lock Compliance.
This role allows the user to manage and enforce compliance-related settings on the system.
Step 4: Set Password Expiration Policy
Configure the Password Aging Policy:
Set Password Expiration or Maximum Days to 180 days.
Ensure Minimum Days and Warning Days are set as needed or required by the compliance policy.
Step 5: Save and Verify
Save the changes and verify that the account asterix1 is now listed with the appropriate role and
password settings.
This configuration ensures that the asterix1 account is in place with the correct permissions and that
the password is set to expire after 180 days. Let me know if you need more assistance!
Question 6
SIMULATION
Task 6
A backup administrator finished installing a PowerProtect DD3300. After the
installation, they notice disk 1.5 is offline after running the disk fail command in the
DDOS CLI.
Using the simulator, flash an LED on the hard drive with the issue and return it to
operation.
When you have finished, continue to the next question.
Answer:
See the
solution in the
explanation below.
Explanation:
To flash an LED on a hard drive and bring a disk back online using the DD System Manager or DDOS
CLI, follow these general steps:
Step 1: Identify the Disk
In DD System Manager:
Go to the Hardware section in the sidebar.
Locate the list of disks, and find Disk 1.5 (the offline disk).
In DDOS CLI (if using CLI):
Use the command to list disks and confirm the status of Disk 1.5.
Command example: disk show state or disk show summary.
Step 2: Flash the LED on the Disk
In DD System Manager:
In the Hardware section, select Disk 1.5.
Look for an option like Flash LED or Locate Drive to help identify the physical disk.
Activate the LED flash to identify the disk physically.
In DDOS CLI:
Use the command: disk locate 1.5 to flash the LED for Disk 1.5.
Step 3: Bring the Disk Back Online
In DD System Manager:
After identifying the disk, check for options to Bring Online or Reactivate Disk 1.5.
Select the option to return the disk to operation.
In DDOS CLI:
Use the command: disk unfail 1.5 to bring the disk back online.
Step 4: Verify the Disk Status
Confirm in DD System Manager or by using the disk show state command in CLI that Disk 1.5 is now
online and functioning.
After completing these steps, the LED should flash to help locate the disk physically, and then Disk
1.5 will be returned to an operational state. Let me know if you need further guidance!
Question 7
SIMULATION
Task 5
Use the simulator to configure a new MTree with a path of /data/col1/oracle. The
MTree size must not be allowed to exceed 200 TiB.
When you have finished, continue to the next question.
Answer:
See the
solution in the
explanation below.
Explanation:
To configure a new MTree with a specified path and size limit in PowerProtect DD, follow these steps:
Step 1: Access the MTree Management Section
In the DD System Manager interface, locate Data Management in the sidebar.
Select MTree from the dropdown menu to manage MTrees.
Step 2: Create a New MTree
Click on Create MTree or Add MTree (the exact button label may vary).
Set the Path for the MTree as /data/col1/oracle.
Step 3: Set the MTree Size Limit
In the MTree creation dialog, look for an option to set a Quota or Size Limit for the MTree.
Set the Size Limit to 200 TiB to ensure the MTree does not exceed this capacity.
Step 4: Save the Configuration
Confirm and save your settings to create the MTree with the specified path and size restriction.
After these steps, you should have a new MTree at /data/col1/oracle with a maximum allowed size of
200 TiB. Let me know if further assistance is required!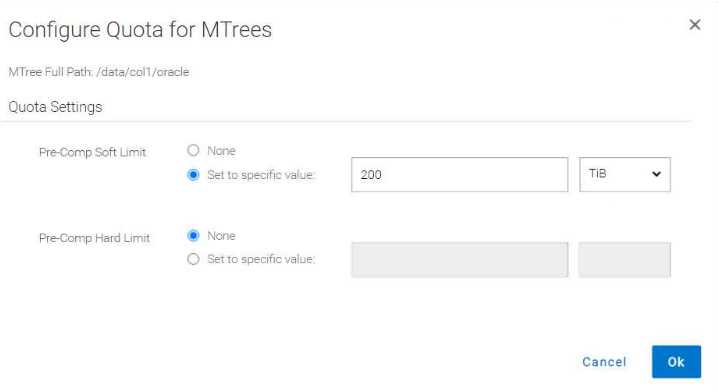
Question 8
SIMULATION
Task4
An administrator needs to create a new non-admin user and a storage unit for their Oracle 'abc123'
department.
Use the simulator to:
- Create a new user: 'DDBoostOracle' with
password: Password123, management role: none,
with Password Aging Policy: Minimum Days: 0,
Maximum Days: 180, Warn Days: 15 days
- Assign the user to the ddboost users.
- Create a new storage unit called: SU_Oracle and assign new user to the storage unit.
Answer:
See the
solution in the
explanation below.
Explanation:
To create a new non-admin user and a storage unit for an Oracle department on PowerProtect DD,
follow these steps:
Step 1: Create the User "DDBoostOracle"
Navigate to the User Management Section:
Look under Administration or Users in the sidebar (the exact location may vary by DD OS version).
Create New User:
Click on Add User or New User.
Enter Username: DDBoostOracle
Enter Password: Password123
Set Management Role to None.
Set Password Aging Policy:
Set Minimum Days: 0
Set Maximum Days: 180
Set Warn Days: 15
Assign the User to DD Boost Users Group:
Locate the option to assign the user to groups and select the ddboost users group.
Save User Configuration:
Confirm and save the settings to create the user.
Step 2: Create the Storage Unit "SU_Oracle"
Navigate to DD Boost Protocol:
Go to Protocols > DD Boost in the sidebar.
Create a New Storage Unit:
Find Storage Units and select Add Storage Unit.
Name the storage unit as SU_Oracle.
Assign the User to the Storage Unit:
During the creation process or in the access settings of the storage unit, assign DDBoostOracle as the
user with access.
Save Storage Unit Configuration:
Confirm and save the configuration to ensure that the new user has access to the storage unit.
This completes the setup for a non-admin user with the specified password aging policy and a
dedicated storage unit for the Oracle department. Let me know if additional steps are needed!
Question 9
SIMULATION
Task3
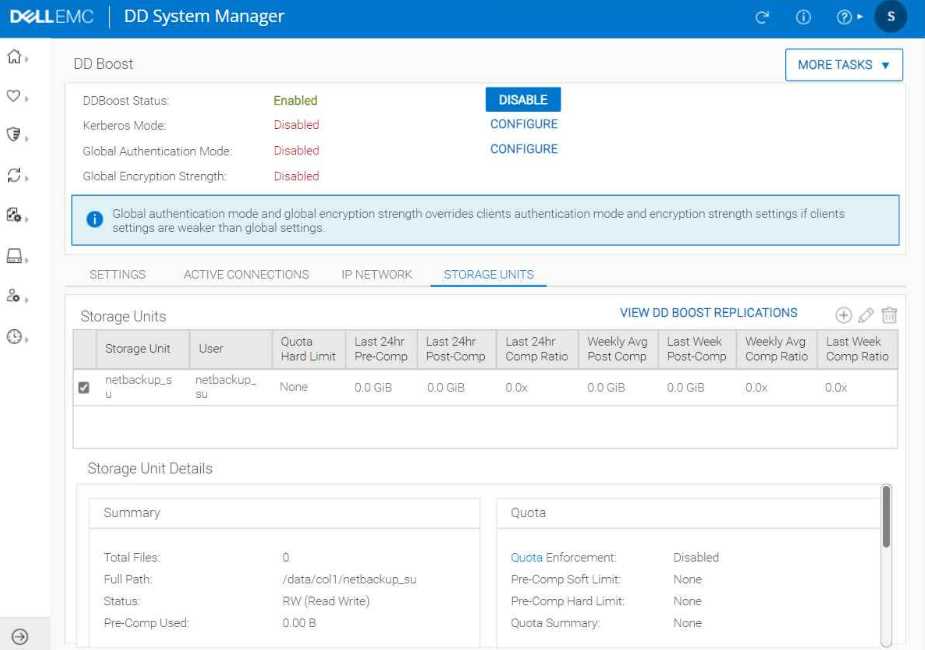
A system administrator is asked to configure a DD Boost storage unit for Veritas NetBackup.
Use the simulator to create netbackup_su and give access to netbackup_user.
When you have finished, continue to the next question.
Answer:
See the
solution in the
explanation below.
Explanation:
To create a DD Boost storage unit for Veritas NetBackup and give access to a user, follow these steps:
Enable DD Boost (if not already enabled):
Navigate to Protocols in the left sidebar.
Select DD Boost and enable it if it’s currently disabled.
Create a New DD Boost User:
Go to Administration or Users section (location may vary depending on the DD OS version).
Add a new user with the username netbackup_user.
Set a password and assign the necessary permissions, such as Read/Write access.
Create a Storage Unit:
Return to the DD Boost section.
Look for an option labeled Storage Units or Add Storage Unit.
Name the storage unit netbackup_su.
During the setup, ensure that netbackup_user has access to this storage unit by assigning
appropriate permissions.
Save and Confirm Settings:
Save the configuration changes.
Verify that netbackup_su is listed as a storage unit and that netbackup_user has access.
After completing these steps, you should have a storage unit named netbackup_su accessible by
netbackup_user, configured specifically for use with Veritas NetBackup on your PowerProtect DD
system. Let me know if further clarification is needed!
Question 10
SIMULATION
Task
Use the simulator to configure DD Boost by enabling it and creating a new user (ddboost) with
the recommended permission. Use Password123 as the password. A storage unit name SU1 must be
created and accessible by the user.
When you have finished, continue to the next question.
Answer:
See the
solution in the
explanation below.
Explanation:
To configure DD Boost, enable it, create a new user, and set up a storage unit in the DD System
Manager, follow these steps:
Enable DD Boost:
In the Protocols section on the left sidebar, locate DD Boost and click on it.
Inside the DD Boost settings, find the option to enable DD Boost if it's currently disabled.
Create a New User:
Go to Administration or Users (location varies based on version).
Select Add User or New User.
Set the username as ddboost and the password as Password123.
Assign the appropriate permissions, typically Admin or Read/Write access, based on best practice
recommendations for DD Boost users.
Create a Storage Unit:
Return to the DD Boost section.
Look for an option labeled Storage Units or similar, and choose Add Storage Unit.
Name the storage unit SU1.
Ensure that the newly created ddboost user has access to this storage unit.
Save and Confirm:
After configuring, save all settings and confirm the changes.
Verify that DD Boost is enabled, the user ddboost exists with the specified permissions, and the
storage unit SU1 is created and accessible by this user.
This completes the setup for DD Boost with a new user and storage unit on PowerProtect DD. Let me
know if you need more assistance with any of these steps.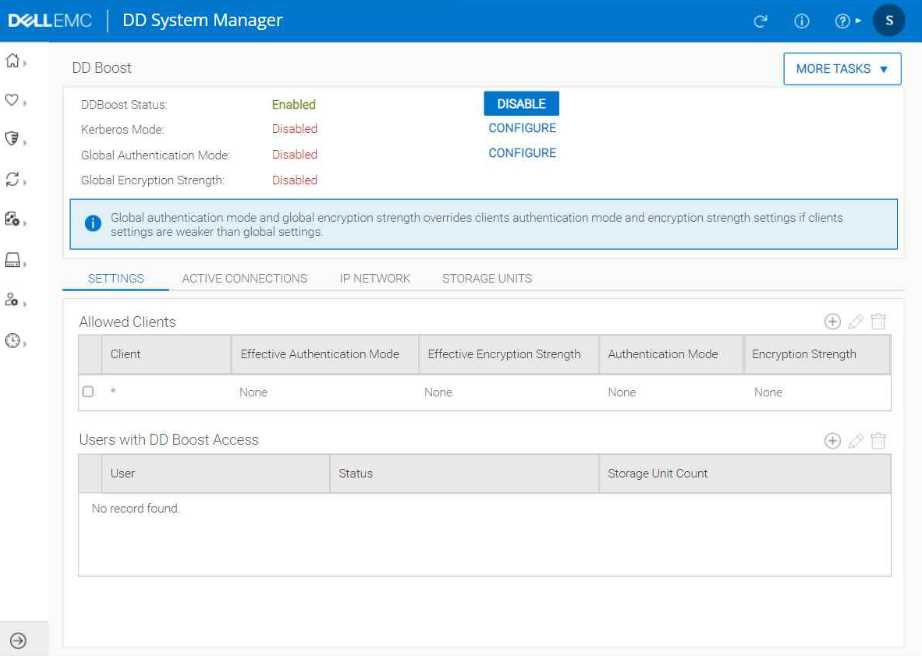
Question 11
SIMULATION
Task
Use the simulator to schedule PowerProtect DD space reclamation to occur every Monday at 4:00
AM without impacting system resources for more than 25%.
When you have finished, continue to the next question.
Answer:
See the
solution in the
explanation below.
Explanation:
To schedule space reclamation on a PowerProtect DD system as specified, here’s the general
procedure to follow in the DD System Manager:
Log into DD System Manager: Access the management interface for your PowerProtect DD system.
Navigate to Data Management: In the sidebar, look for an option labeled Data Management or
similar (may vary slightly depending on the exact DD OS version).
Select Space Reclamation: Within Data Management, find and select Space Reclamation settings.
Set Schedule:
Click on Schedule and choose to add a new schedule if not already present.
Set the Day to Monday.
Set the Time to 4:00 AM.
Configure Resource Limit:
Look for an option to limit the resource usage for the reclamation task.
Set the Maximum System Resource Usage (or a similarly named option) to 25% to avoid impacting
the system performance excessively.
Save the Schedule: Confirm and save your settings.
Verify the Schedule: Check that the schedule appears correctly in the list, indicating it will run every
Monday at 4:00 AM with the specified resource usage limit.
After completing these steps, the PowerProtect DD system should reclaim space as scheduled
without exceeding 25% resource usage, minimizing its impact on other system operations.
Question 12
A PowerProtect system administrator would like to enable the tape out to cloud feature.
Which three requirements must be met prior to installing the tape out to cloud license? (Choose
three.)
- A. A replication license is installed.
- B. A DD Boost user is assiqned.
- C. A cloud profile is created.
- D. A VTL license is installed.
- E. A Dell Cloud Tier license is installed.
Answer:
C, D, E
Explanation:
A cloud profile is created: Before using the tape out to cloud feature, a cloud profile must be set up to
define the parameters and configurations for the cloud storage destination.
A VTL license is installed: The Virtual Tape Library (VTL) license is necessary as the tape out
functionality relies on the VTL framework to manage the virtual tapes.
A Dell Cloud Tier license is installed: The Dell Cloud Tier license is essential for enabling tiering of
data to cloud storage, which is a prerequisite for utilizing tape out to cloud functionality.
Topic 2, Simulations
Question 13
What is a characteristic of the Global-Compression Factor?
- A. It measures the data reduction effect of the compression algorithms.
- B. It displays the amount of storage that the system uses after data reduction.
- C. It is a product of the global compression and local compression factors.
- D. It measures the data reduction effect of deduplication.
Answer:
A
Explanation:
The Global-Compression Factor quantifies how effectively the compression algorithms are reducing
the size of the data stored on the system. It reflects the overall impact of compression on data size,
helping administrators understand the efficiency of the compression techniques being applied.
Question 14
Which is the default IP address assigned to PowerProtect DD iDRAC?
- A. 192.168.100.100
- B. 192.168.10.100
- C. 192.168.0.120
- D. 192.160.1.120
Answer:
C
Explanation:
The iDRAC (Integrated Dell Remote Access Controller) for PowerProtect DD appliances is typically set
to this default IP address, allowing administrators to access the management interface for remote
management and monitoring. This IP address can be changed as needed to fit the network
configuration.
Question 15
A customer is attempting to configure VTL with 68 libraries, 800 slots, 524 drives, and 100 CAPs each
but is unable to complete the configuration.
What is the cause of this issue?
- A. Reach CAPs limit
- B. Reached libraries limit
- C. Reached drives limit
- D. Reached slots limit
Answer:
B
Explanation:
PowerProtect DD appliances have specific limits on the number of libraries, slots, drives, and CAPs
that can be configured. In this case, reaching the limit of 68 libraries likely exceeds the maximum
allowed, preventing the configuration from being completed. Each component has its own limits, but
in this scenario, the number of libraries is the bottleneck that prevents successful configuration.